When a crumbling carport forced DIY renovator and content creator Bec Riley to take action, she didn’t just fix the problem… she reimagined the entire house facade. What started as a practical repair quickly snowballed into a full front-of-house transformation, complete with natural limestone, cladding, render and a completely refreshed colour palette. This is a luxe stone facade makeover you do not want to miss!
The best part? It was a DIY project! Bec stopped by Style Curator to share her tips, lessons and tricks in how she transformed an ugly brick wall into a luxurious stone wall.
Related article: DIY patterned tile outdoor table
Related article: 5 creative uses for shipping containers at home
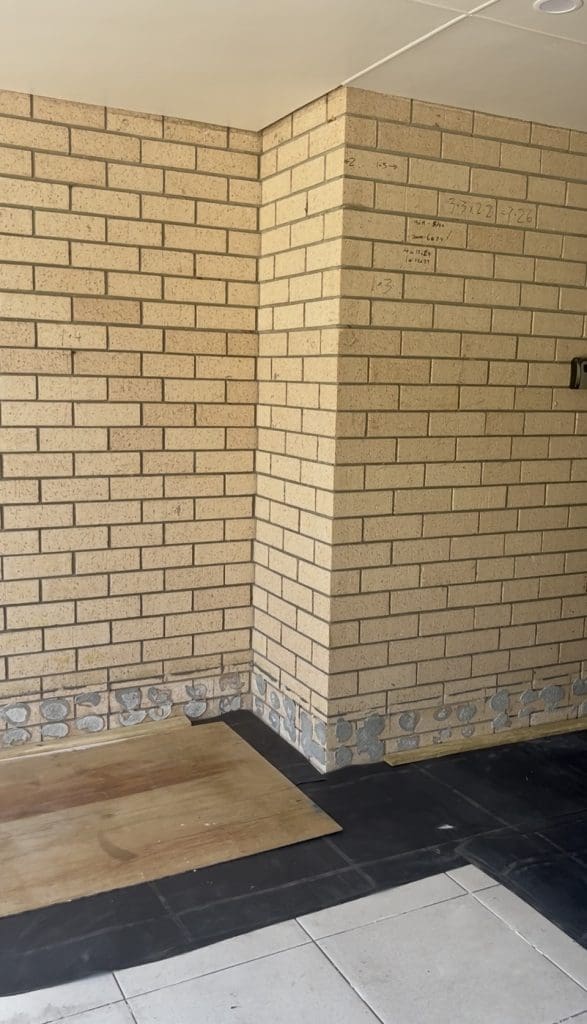
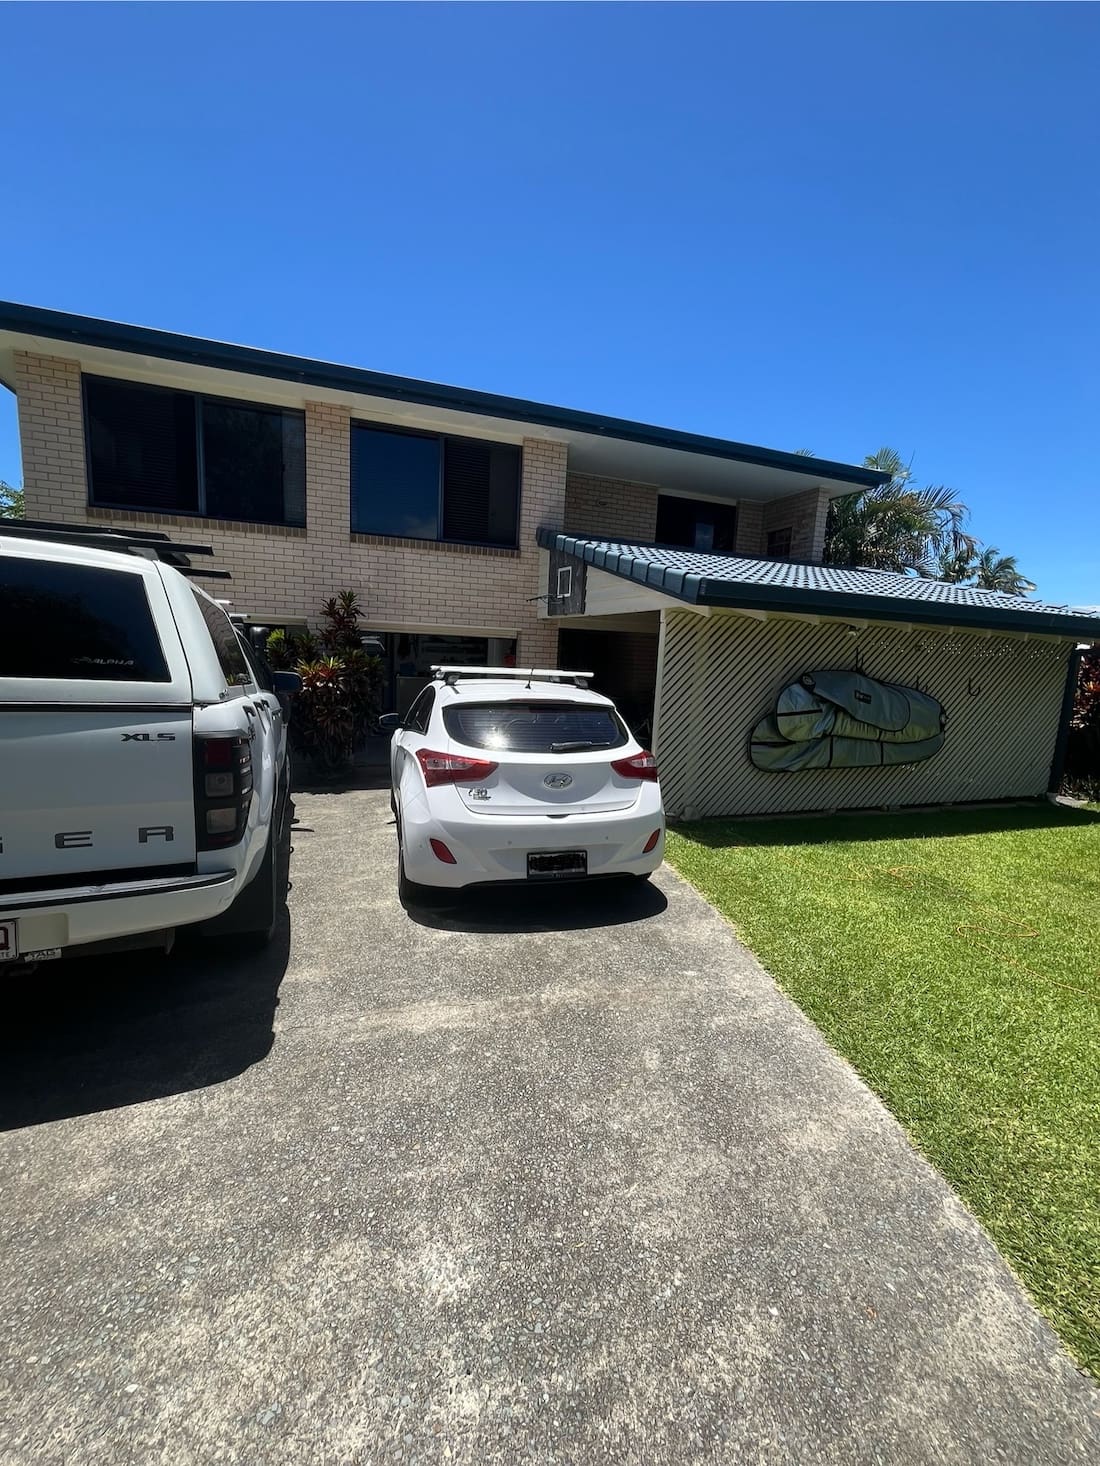
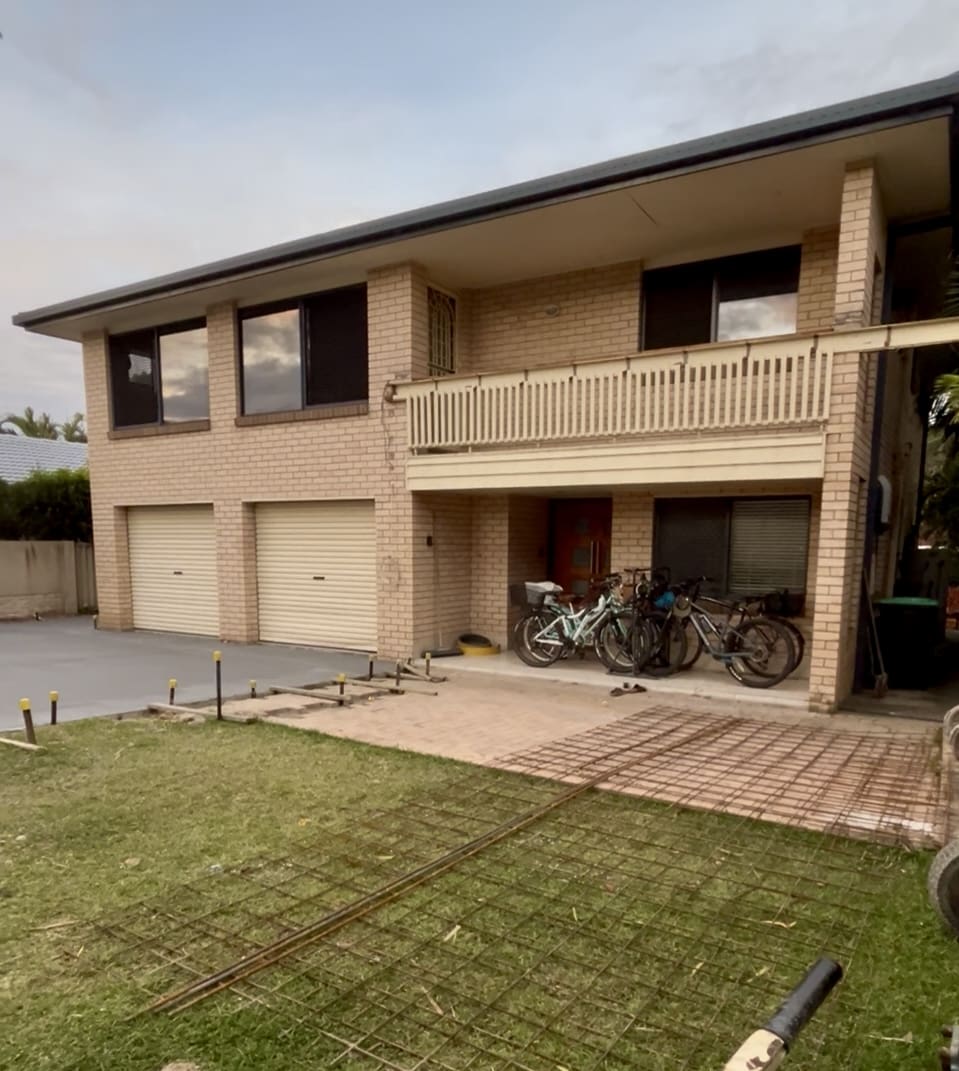
What started out as a structural problem turned into a DIY project that became a luxe stone statement.
“The whole project started because our existing carport was falling down,” Bec explains. “Well, that certainly snowballed!
“I’d seen the stone wall trend across the Gold Coast and fell in love with it. Like many home renovators, we were on a budget and the cost of having a professional stonemason do the work simply wasn’t an option. So the only other choice was to have a go myself!
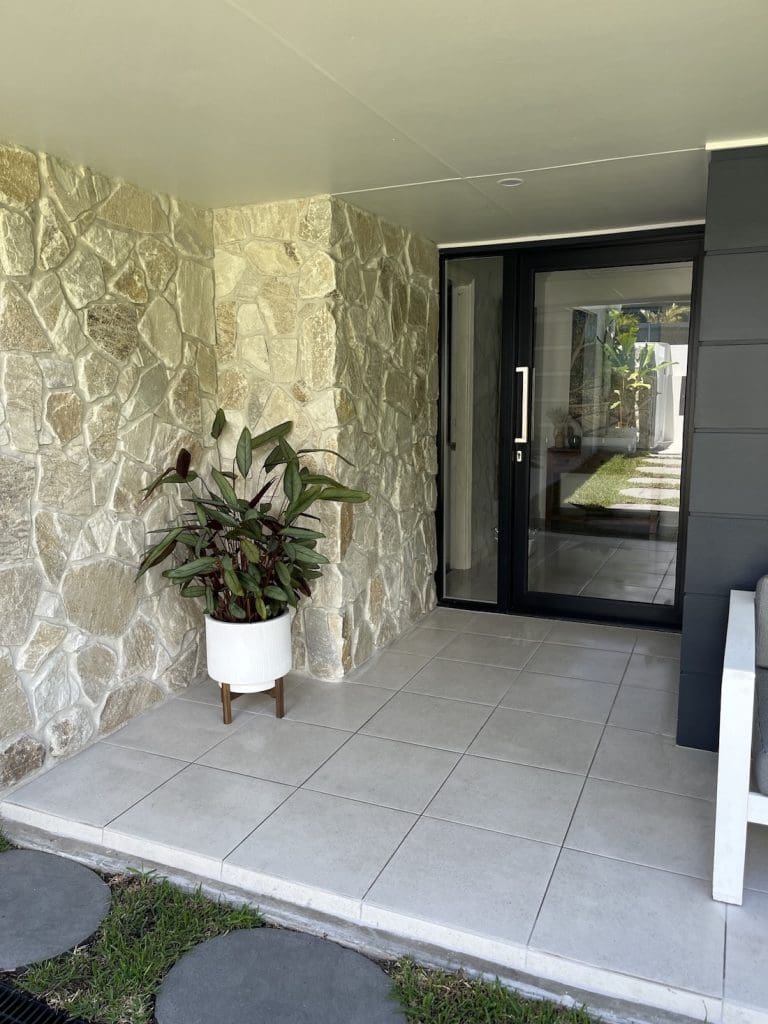
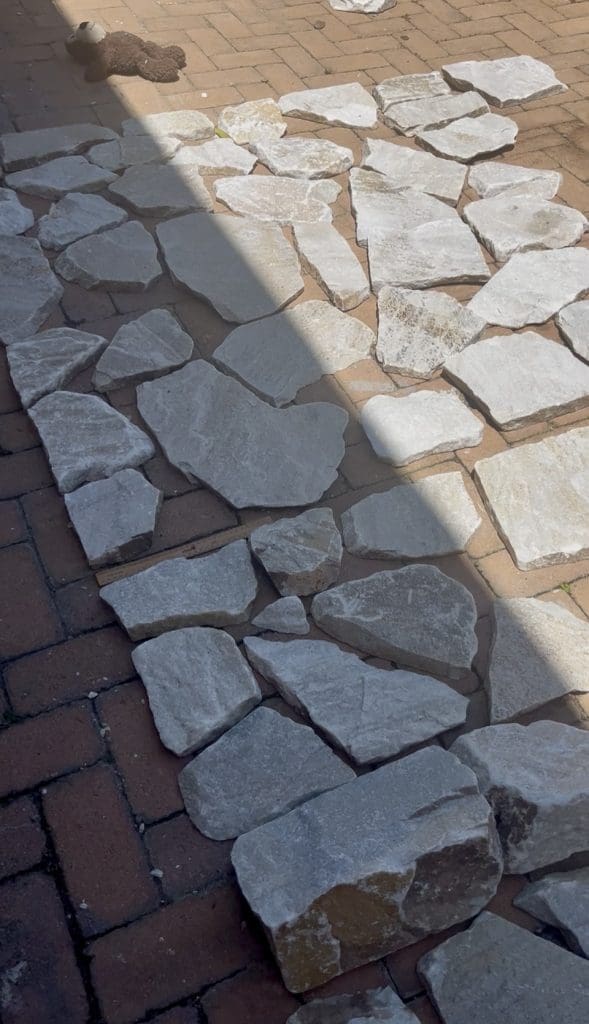
“I fell head over heels in love with the natural stone. I sourced it locally from Stone Style in Currumbin on the Gold Coast. It’s a limestone called Oslo and has a natural variation of cool tones paired with a sprinkle of warm earthy shades. In the sunlight it gives off a beautiful sparkle.
“For the adhesive, I spoke with the very knowledgable team at National Tiles. They were more than happy to share their knowledge, and suggested I use a very strong tile adhesive. Then for the grout I used a mix of Builders Loam, Off-White Cement and Lime in the ratios of 3:1:0.5.”
Bec is the first to admit she was a DIY novice when it came to this major luxe stone facade transformation.
“First and foremost… do your research!” says Bec with a laugh. “The type of wall you are affixing your stone to will determine what prep work you need to do beforehand.
“The stone is extremely heavy, so getting advice from a professional on whether or not your wall will stand up to the weight is super important.
“I did a lot of research into this project as I had absolutely no idea where to even start! Don’t be afraid to ask questions — there are plenty of people in the industry who know their stuff and are willing to help. In the end I just had to jump in and give it a go.
“Another tip is don’t rush it. Give yourself creative licence to take your time. Also, I’d suggest not having too many people adhering the stone. Your style and placement will probably be very different to someone else’s!
Don’t look for a pattern, just let the stone guide you. Yes, I know that sounds corny, but
it’s so true!
“I actually found working with stone very grounding and therapeutic.”
For those considering their own luxe stone facade project, Bec’s method offers a practical roadmap.
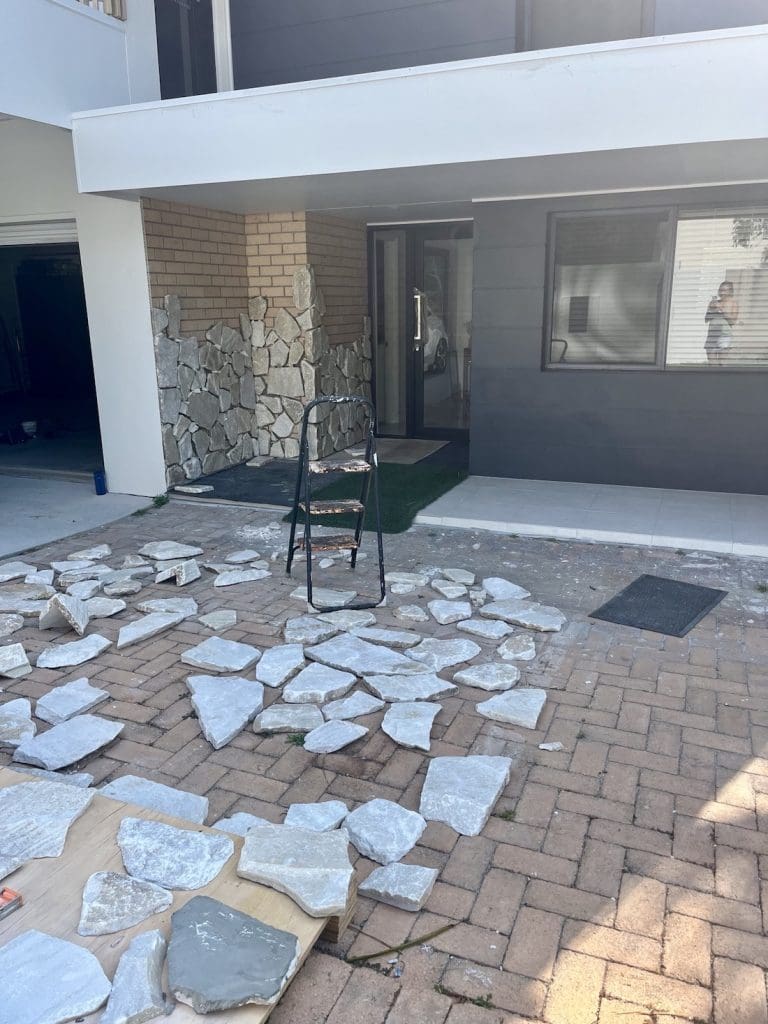
Step 1: Lay it out (loosely)
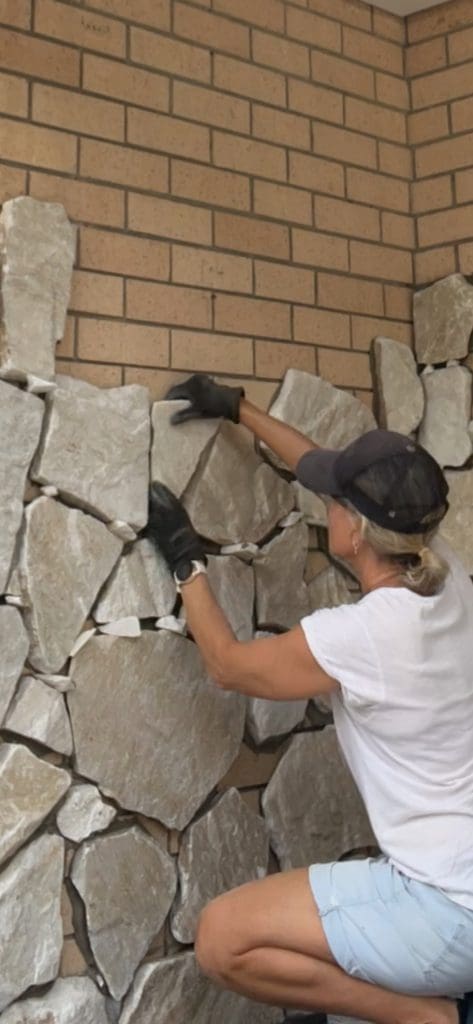
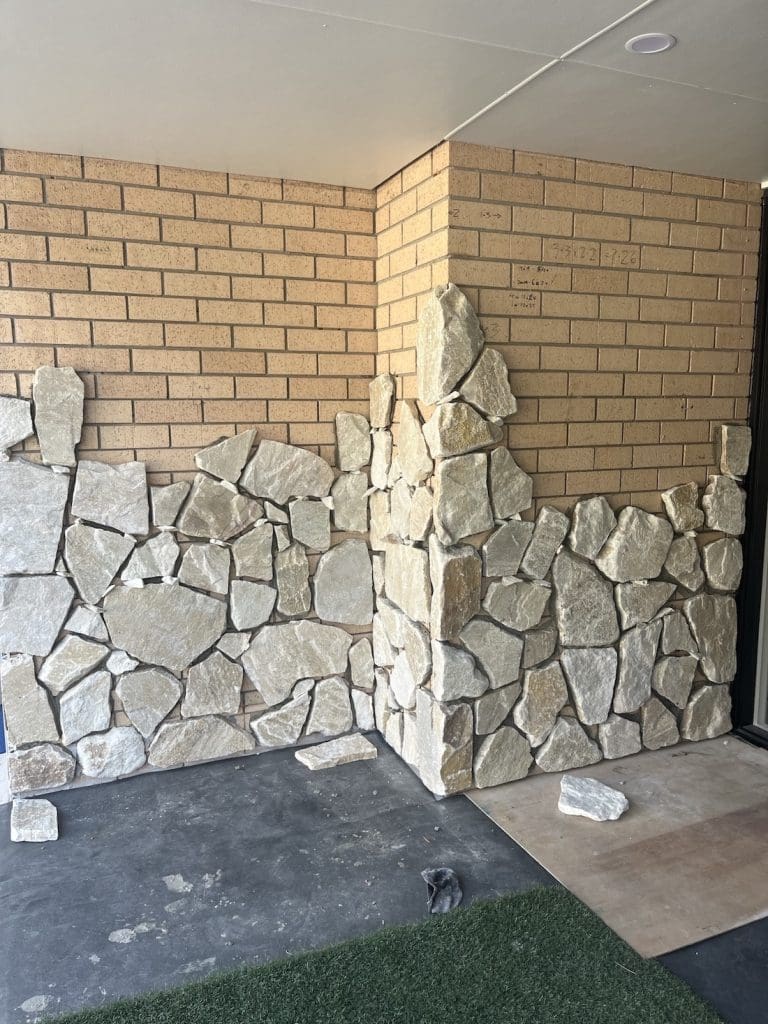
“When I first got the pallet of stone I laid it out, roughly how I thought it would go on the wall. I put it just in front of where I was working and looked for shapes that fit together naturally. I looked for straight edged stone for the edges of the wall so it finished nicely.
“It was helpful to see what stone I had, but in the end, it went up on the wall totally different to how I’d laid it out,” laughs Bec.
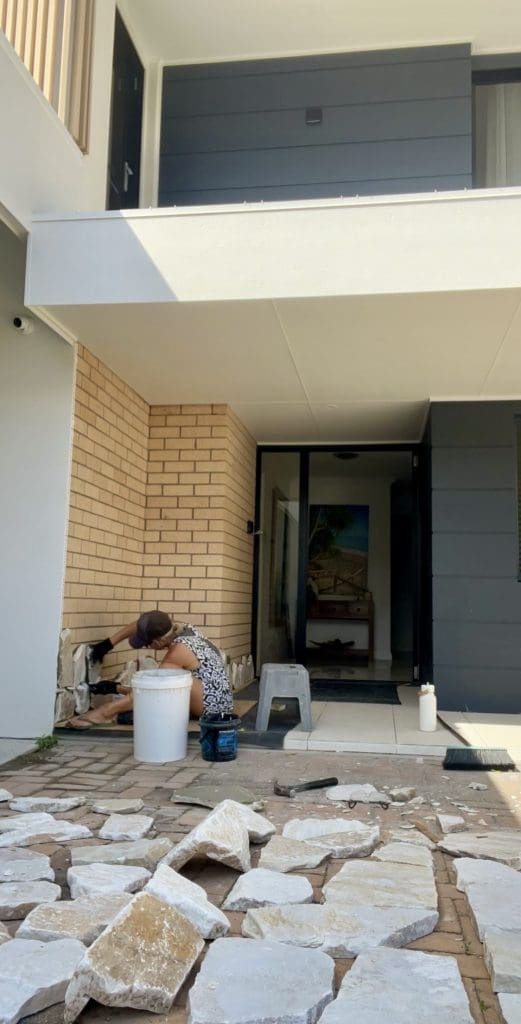
Step 2: Mix your adhesive (carefully!)
“Each time I worked on the wall, I only mixed up the amount of adhesive that I needed, as I didn’t want it to go to waste.
Getting the right consistency was paramount. I was told to go for a consistency similar to toothpaste. Too wet, and your stone will slide down the wall. And yes… I found that out the hard way!
Step 3: Work in sections
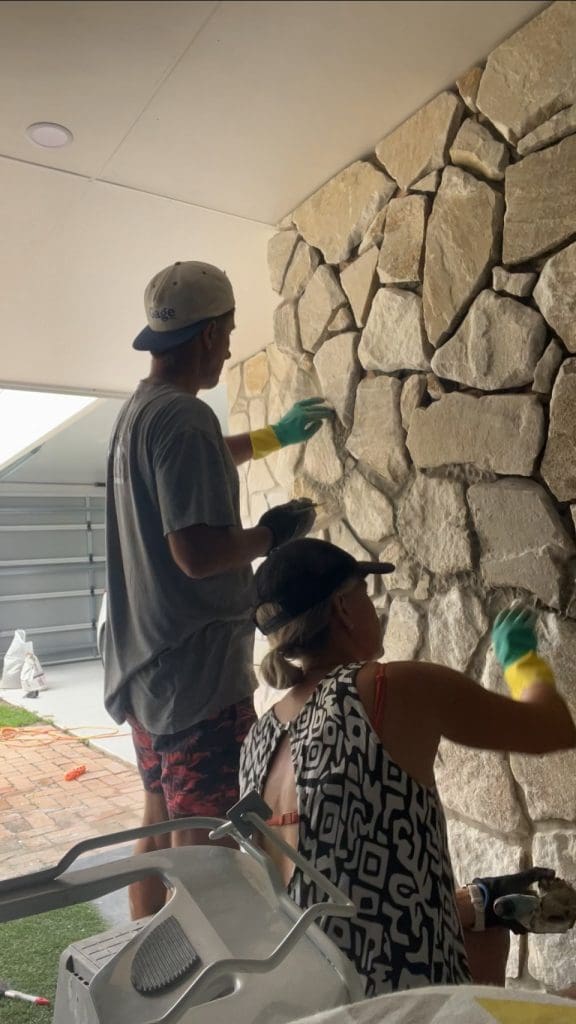
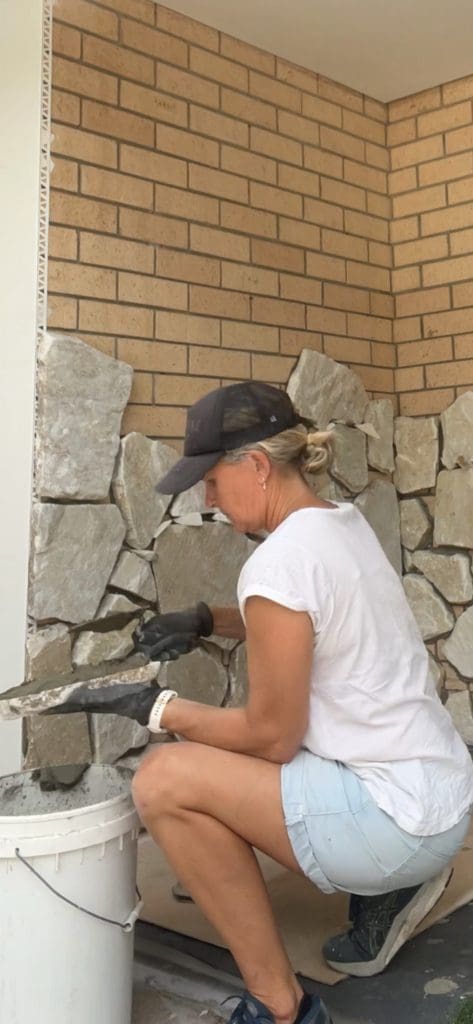
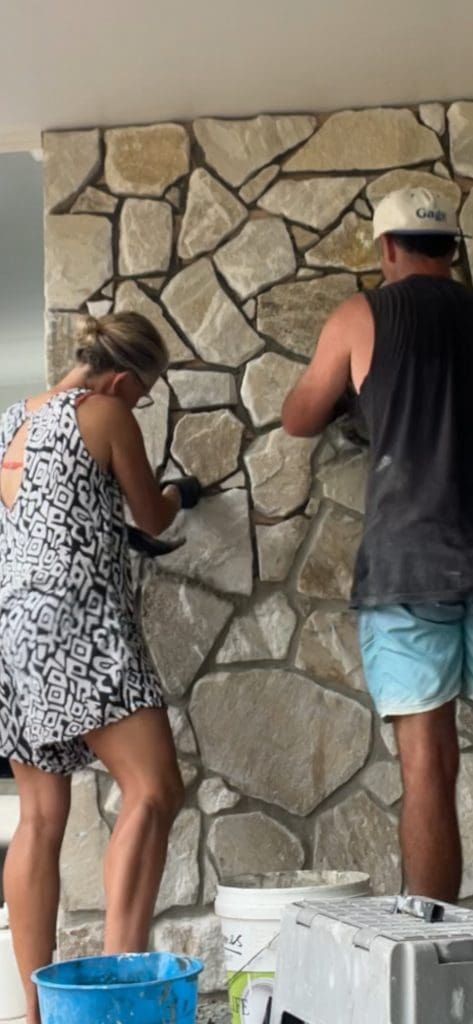
“A great tip was that I used small off cuts of stone as chocks to hold the stone in place while it dried. I found what worked best was to work a small way up at a time. This gave the adhesive time to dry before the next layers went on.
“Be aware of what sort of gap you want between your stone that the grout will fill. And then, use a mallet to lightly tap the stone once you have pressed and wiggled it into place.”
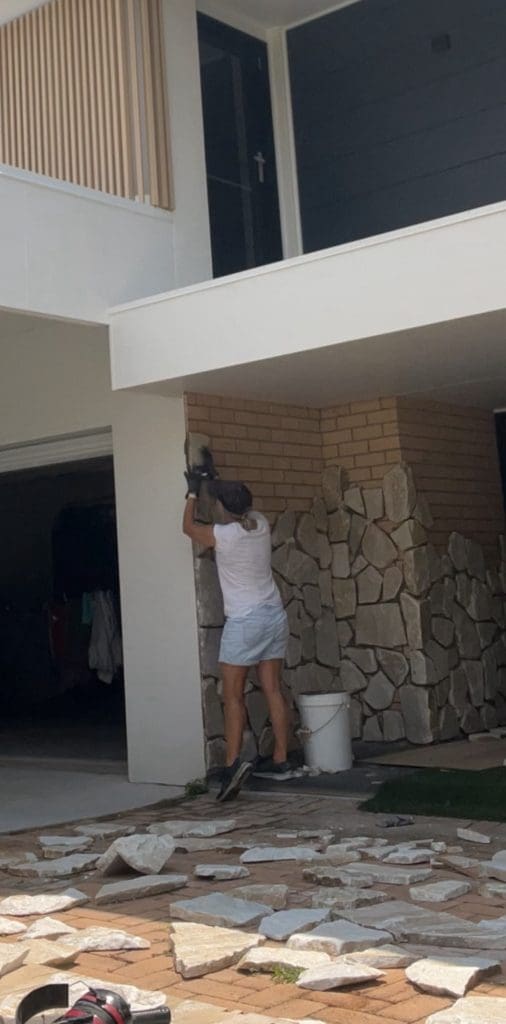
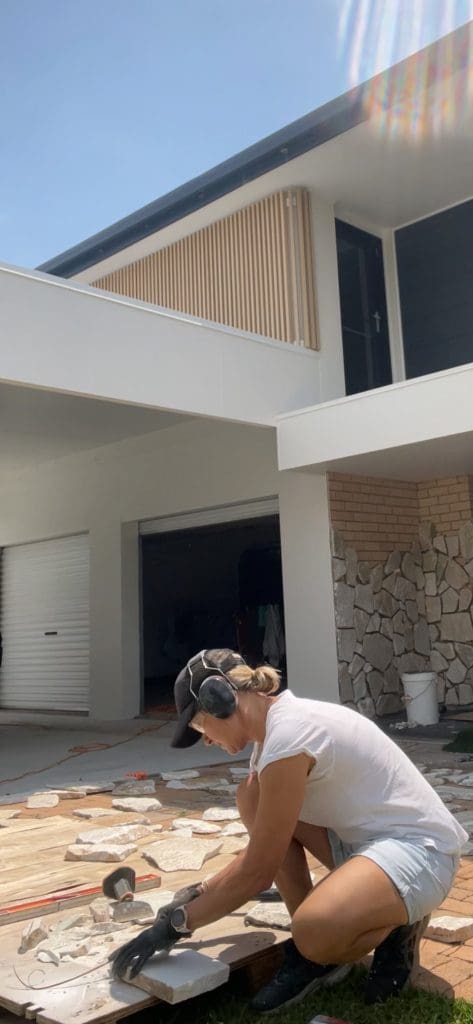
Step 4: Cutting and corners
“To cut the stone, I used a diamond blade. The other tools I found helpful were a hammer and chisel. I would suggest getting professional advice on the right tools and safety gear you need, as all stone has different qualities and hardness,” says Bec wisely.
“I used pre-made corner pieces for the external corner, which made it super neat. For the internal corner, I just fit the stone together.
“Once all your big stones are in, you’ll find there are some gaps that you can fill with some smaller off-cut pieces.”
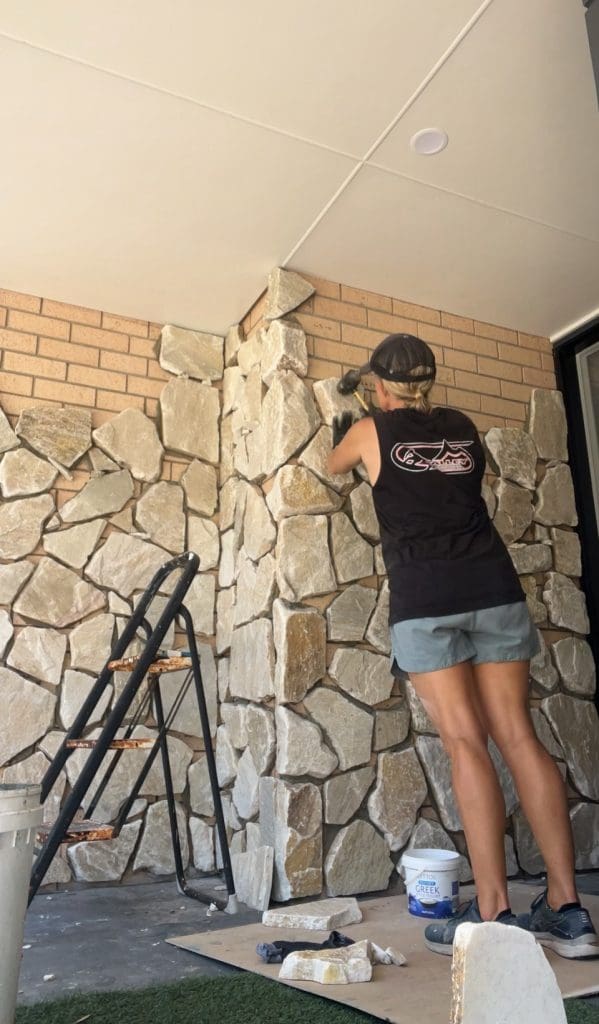
Step 5: Grout (aka the tedious stage)
“I won’t lie… this stage was my least favourite!” smiles Bec. “I found this part a little tedious, but thankfully my husband came on board, and we got through it together.
“My top tips would be to push the grout all the way into the gaps. We did a small section at a time as it was quite a process.
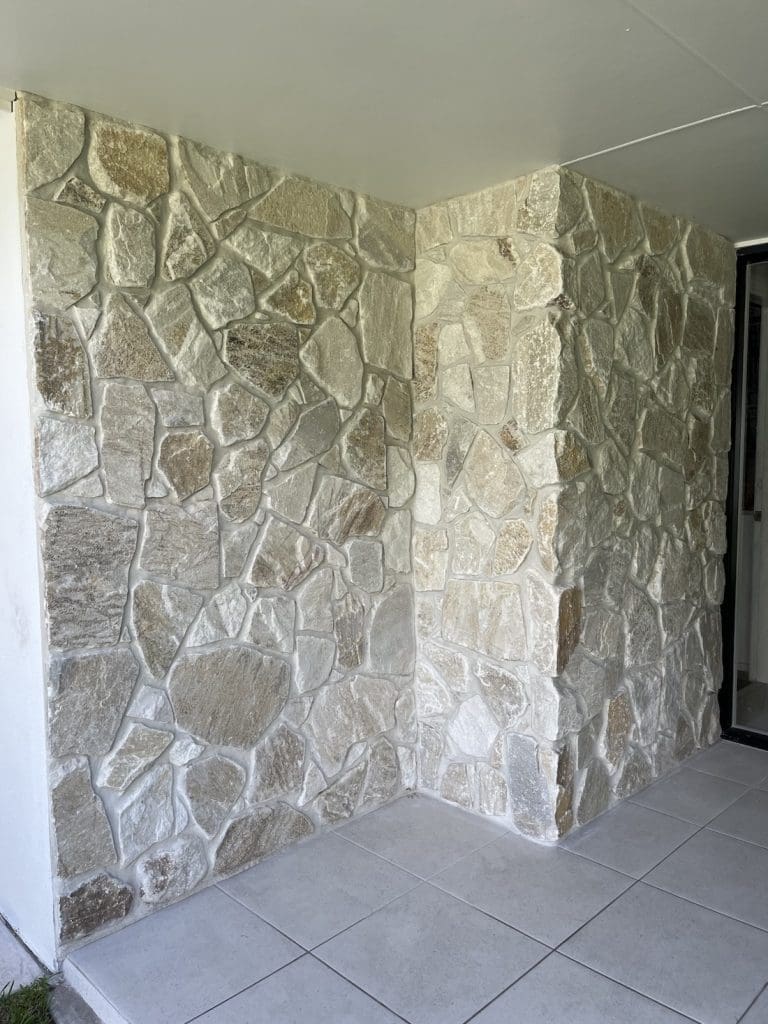
“Applying the grout, then allowing it to dry a bit before scraping out as much as you want to define the stone. Scraping and smoothing the grout to get the finish you want. It was tough going but the end result made it SO worth it!”
As with all DIY projects, we were keen to learn about any tips Bec picked up along the way.
“There were a few things! Firstly, look at the thickness of the stone on the wall. Do you need to put extra adhesive behind it to bring it out level? A good idea is to look at your wall from side on, to ensure it’s all sitting nice and level,” suggests Bec.
“Before choosing my stone, Stone Style gave me a few addresses that had used the stone I chose. I did a drive by to check it out on a grander scale. This was very helpful as the stone I thought I would use I quickly realised was not the right one for the look I was hoping to achieve.
“Grout (the bane of my existence!). Be careful not to get too much grout over your stone as it can leave a concrete haze. I found a steel brush the best thing in getting it off once it had dried. Just be aware this may scratch some rock types, but seemed fine on the limestone.
“Don’t try to remove much when it’s wet as it will just smear it and make it even MORE difficult to remove. I couldn’t get much advice on a product to help remove the haze from natural stone. I’d love to hear any suggestions that have worked for other people!”
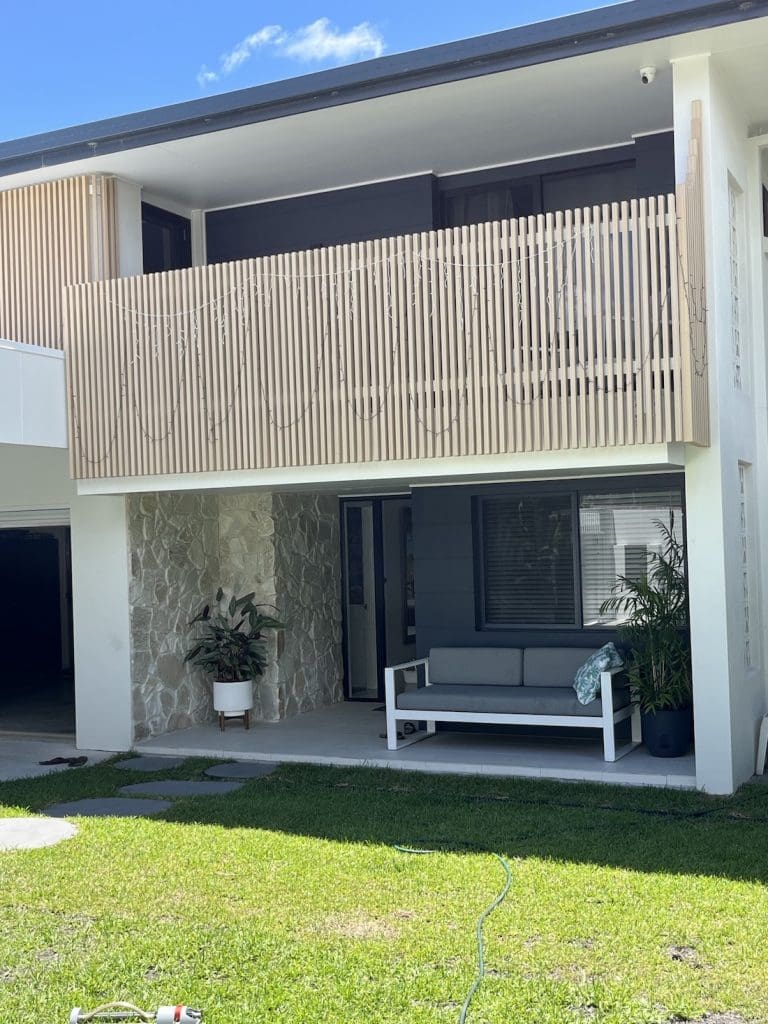
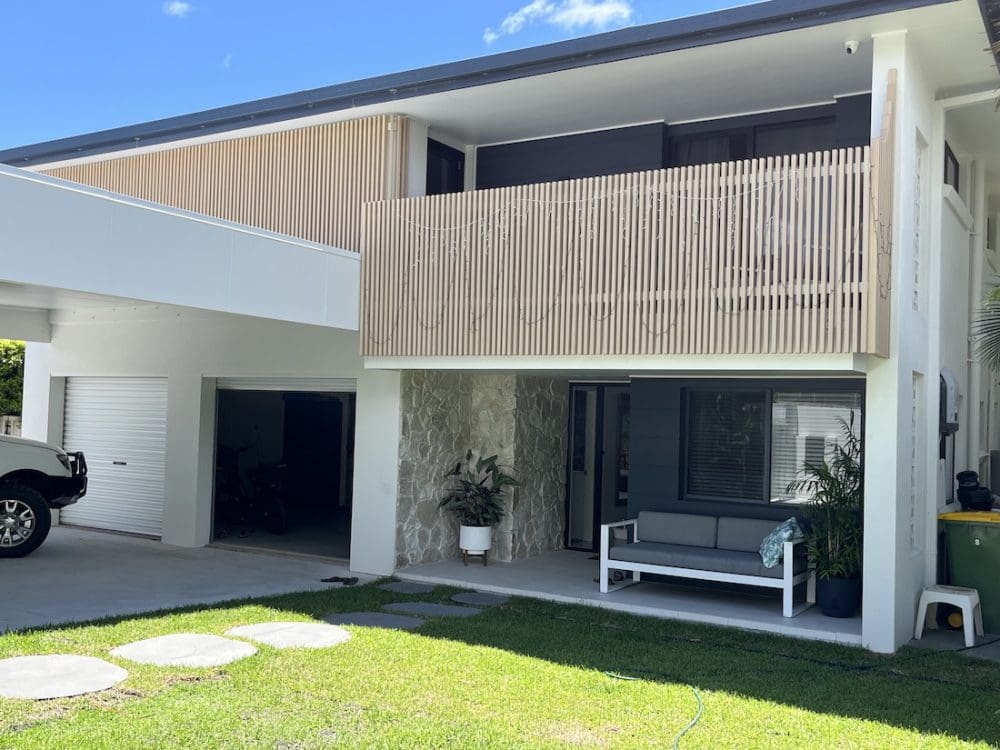
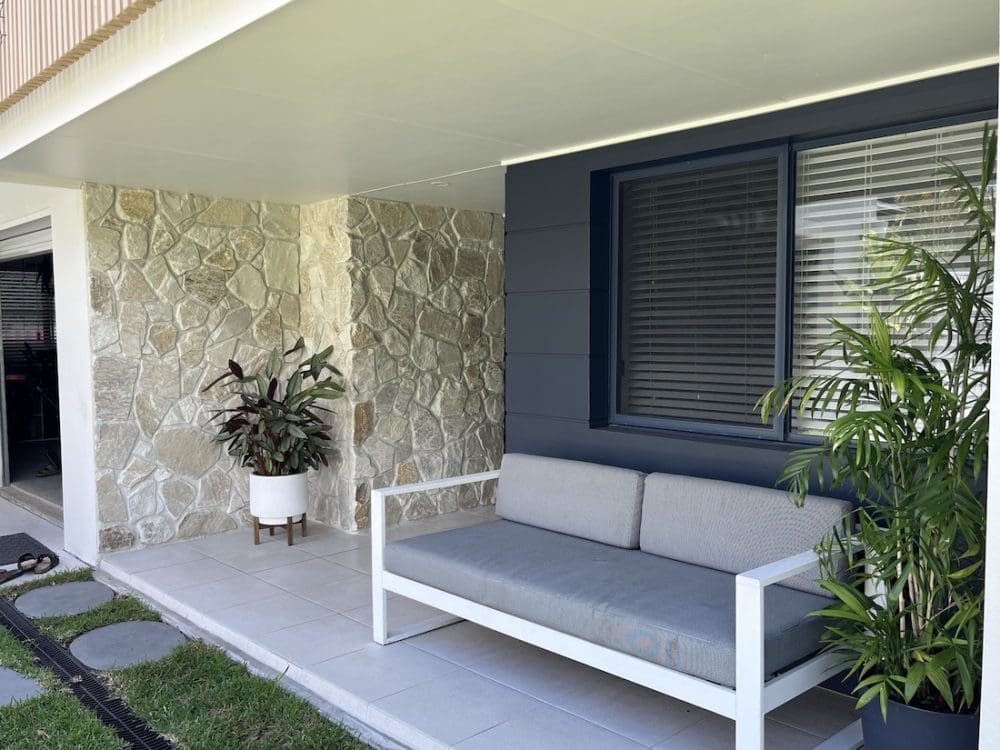
From a tired and outdated exterior to a luxe stone facade, this is now a home that makes a real statement.
“The stone wall has certainly elevated the facade of our house,” says Bec proudly. “After 15 years of looking at the yellow brick, we are stoked with the outcome.
“The whole facade project took us an entire year to complete. Between waiting on trades, waiting on materials, painting the full double storey house ourselves, and finding the time to complete the landscaping.
“But we have finally done it and couldn’t be happier! In the end, we used a combination of materials to cover the brick.
“We used Stria weatherboards on the front porches and painted them in the beautiful colour, Oolong by Dulux. There is stone at the front door and some composite cladding and battening by NewTechWood in the colour Canadian Cedar.
“For the rest of the house, we ended up rendering and painting it. The paint colour we used was White Exchange Half by Dulux.
“We did contemplate just painting the brick, but I’m not a huge fan. Although, we did paint our ugly brick fence, and I do love the texture its brought to the garden. All in all, we love our new home facade and the stone wall is definitely a firm favourite!”
Huge thanks to Bec for sharing this amazing DIY project with us. Has it inspired you to have a go at creating your own luxe stone facade? We hope this article has given you some tips, trick and DIY inspiration.
You can follow along with other home DIY projects and holiday adventures on Bec’s Instagram page, Riley Good Adventures.
Find more outdoor DIY projects here