
As you know, we can’t get enough of our concrete DIYs! During the festive season when so much decor is made from plastic, it’s nice to introduce some natural, organic materials into your home. These DIY concrete Christmas trees combine two of our favourite materials — raw concrete with blingy metallic — to create modern, minimalist and on-trend Christmas accessories for your home.
You will only need a few materials and can make these trees in five easy steps! Plus there are plenty of ways you can adapt this Christmas decor tutorial to suit your personal home aesthetic. For example, consider adding oxides to the cement to make trees in various hues. However you choose to make them, they’ve got a real DIY Scandinavian Christmas decor vibe about them. Keep scrolling for all the steps…
Related article: Easy Christmas decor DIYs: 38 Christmas DIY ideas to decorate your home
Related article: DIY Christmas clay ornament: Easiest tutorial to make clay at home
Items you will need
- Cement
- Sand
- Gold paint (we used Haymes Gold Dabs)
- Plastic sheet (we picked ours up from IKEA)
- Bucket
- Stirrer
- Paint brush
- Scissors
- Sticky tape
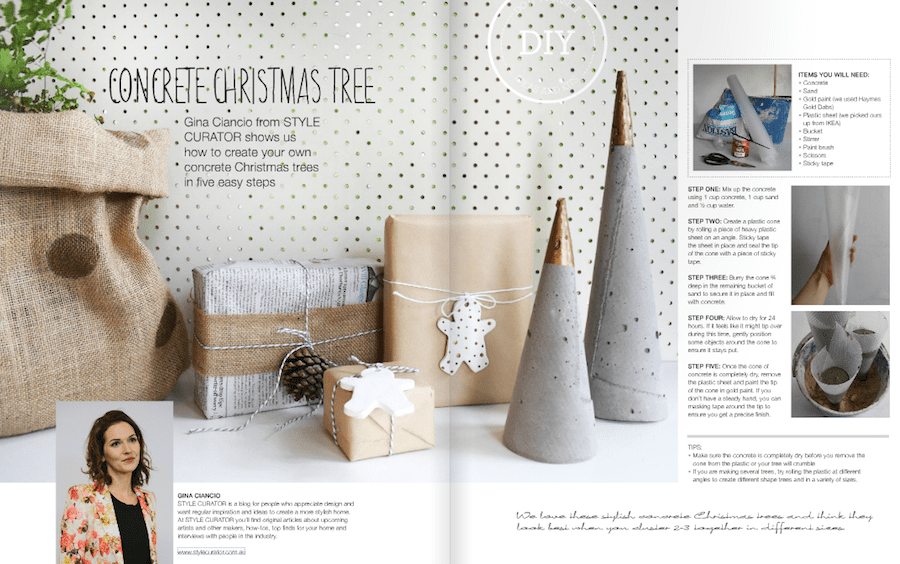
Steps:
1. Mix up the concrete using 1 cup cement, 1 cup sand and ½ cup water.
2. Create a plastic cone by rolling a piece of heavy plastic sheet on an angle. Sticky tape the sheet in place and seal the tip of the cone with a piece of sticky tape.
3. Burry the cone ¾ deep in the remaining bucket of sand to secure it in place and fill with concrete.
4. Allow to dry for 24 hours. If it feels like it might tip over during this time, gently position some objects around the cone so it stays put.
5. Once the cone of concrete is completely dry, remove the plastic sheet and paint the tip of the cone in gold paint. If you don’t have a steady hand, you can masking tape around the tip to get a clean edge.
Tips:
- Make sure the concrete is completely dry before you remove the cone from the plastic or your tree will crumble.
- If you are making several trees, try rolling the plastic at different angles to create different shape trees and in a variety of sizes. For example, some could be shorter and wider, while others could be tall and narrow.
We love these stylish concrete Christmas trees and think they look best when you cluster 2-3 together in different sizes.
We were so excited to have this Christmas tutorial feature in Winkelen Magazine! Check out our DIY and stacks of other Christmas inspiration in this month’s free publication below!


