
As you probably heard, Baby #2 is on the way and will be here in just a couple of months so I’ve begun clearing out the ‘junk room’ to turn it into a sweet nursery space. I’ve just been chipping away at this by decluttering. But if your junk room is in a state, you may need an Australia wide Junk Removal service.
Like last time, we’ve kept the gender of this baby a surprise but I have a strong feeling it’s a girl and have been so confident that I’ve even been tempted to go ahead and paint pink feature walls. But I haven’t and I’ve told myself that can wait! I’m telling you this though as this dresser project has a feminine touch with the handles that I selected — I figured I could easily swap these if we do end up having a boy.
Unlike last time though, I’m a lot more relaxed about pulling the nursery space together. Not everything has to be new or ‘on trend’, in fact, over the years I’ve come to realise that the most beautiful spaces are a layering of old and new, high and low, that all tells a story or shows the personality of the people who live there (and this baby has a mum who loves to DIY!).
I just finished the first DIY project — a baby change table upcycle — using an old timber dresser I got from the Salvos for $20 and the new Dulux Duramax chalky finish spray paint in ‘Riviera Grey’.
If you have an old piece of furniture or are looking for an affordable yet stylish nursery change table idea, keep on reading!
Related article: Alexander’s Australian inspired nursery
Related article: DIY baby play gym: Make a stylish timber play gym for your baby
Dresser before…

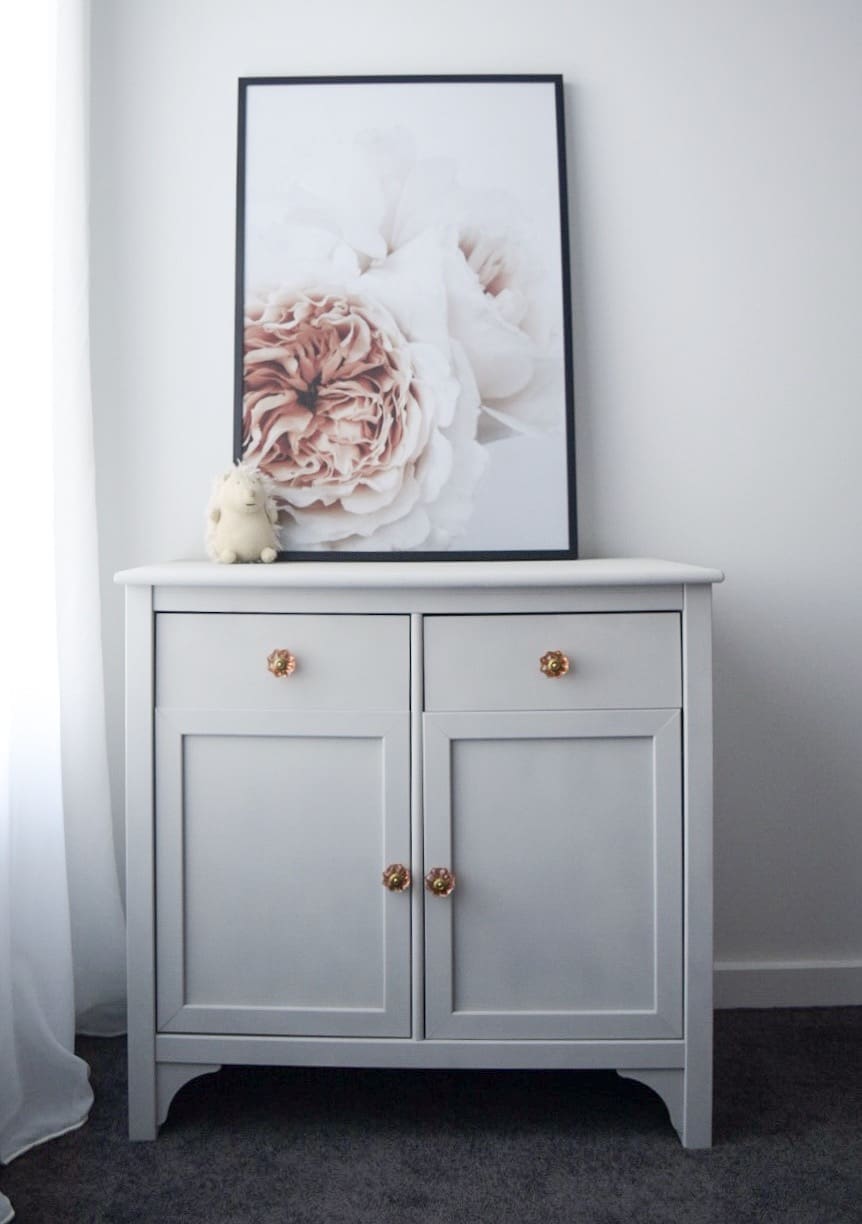
Dresser after…
Items I used:
- Old dresser (the Salvos and Gumtree always have loads of options)
- Dulux Duramax Chalky Finish spray paint in ‘Riviera Grey’ (3 cans provided 2 generous coats including inside the cupboard)
- Handles (Etsy has loads of options including brass knobs, crystals and painted ceramic)
- Wallpaper (I used a silver palm print from Wallpaper Trader)
- Fine grit sandpaper
- Sugar soap, bucket and sponge
- Clean rag
- Newspaper
- Painters tape (optional)
- Face mask
Steps:
1. When upcycling furniture, you cannot underestimate the importance of good prep! Remove old hardware and if you like, you can remove doors but I kept mine on. Sand the piece back using fine grit sandpaper in a circular motion until any bumps or imperfections feel smooth. Even if you have a laminate piece, give it a light sand all over to remove debris and better prepare the surface for painting.


2. Wash the piece using a bucket of warm water and sugar soap. Depending on the amount of sanding you did, you may need to wash it a second time with a fresh bucket of sugar soap and new sponge as it’s important to remove all residue.

3. Once dry, wipe down with a clean rag. Check there’s no fluff and the piece is as clean as can be.
4. Prep for painting by standing the furniture piece on an old sheet or placing newspaper underneath to protect your floors. If you don’t plan on spraying the entire piece, use painters tape to tape off the edges where you want to finish spraying (for example, I only wanted to paint the face of the drawers and not inside so I taped an edge around the inside of the drawers and wrapped newspaper over the area I didn’t want sprayed).
5. Now the hard part is over and the fun can start! Shake the spray cans well, put your face mask on and begin spraying. For best results, keep the can upright and hold it 10-25cm away from the furniture piece and make sure you are working in a clean area so no dust will stick to the wet paint (also ensure it’s well ventilated).
Note: It’s important to read the information on the label of the paint you select as some paints will require an undercoat (such as if you’re painting metal) or may not be suitable for the material of your furniture piece. I chose the Dulux Duramax chalky finish spray paint as it’s formulated to resist cracking and chipping and performs well with household cleaners — and from experience I know a change table needs to be easy to clean!


6. Allow to dry for 8 hours before applying a second coat.
7. Once dry, check the quality of your painting. If it’s patchy at all, you may need to do a 3rd coat or touch up some areas.
8. Place new handles on. I chose these peachy-pink crystal-like handles with brass detail as I love the sweet, elegant look of them but was tempted to DIY my own handles using pieces of raw crystal. In the end, I thought they may be a little dangerous for a little one’s room so opted for these smoother ones.

9. Line the drawers with wallpaper. This is an optional step depending on whether your piece has drawers or the look you want to achieve. But the inside of these drawers were old and rather than painting them too, I thought I’d introduce a new material for interest. I found this beautiful designer wallpaper from Wallpaper Trader which picks up on the colour tones of the furniture piece beautifully. I simply measured the inside of my drawers, cut the wallpaper to size and glued it down.
Tip: You could also use wallpaper to line the inside cupboard shelves for interest and to help prevent scratching.


10. Your furniture upcycle piece is now complete! All that’s left to do is place it in your space and style. I filled the drawers with changing essentials such as nappies, wipes, baby lotion and massage oil. Biome has a great range of totally natural, palm oil free products.
On top of the dresser I’m just resting a wall print for now but I can’t wait to style it up. I also have plans to make some nursery DIYs… and of course will place a change mattress on top.


Has this baby change table upcycle inspired you to makeover a piece of furniture in your home?
More DIYs
Disclaimer: Some of the materials featured in this post were gifted.

